Create and Connect a Remote GKE Cluster to Data Lakehouse
Introduction
Ilum empowers you to manage a powerful multi-cluster setup from a single, central control plane. While Ilum automates the deployment and configuration of its core components, setting up the underlying infrastructure requires precise coordination.
This guide provides a comprehensive walkthrough for setting up a multi-cluster architecture on Moteur Google Kubernetes (GKE). You will learn how to:
- Provision a central control plane (Master Cluster).
- Set up a dedicated execution environment (Remote Cluster).
- Establish secure communication between them using client certificates and ingress rules.
This guide walks you through the steps required to launch your first Ilum Job on a remote cluster. We use Google Kubernetes Engine (GKE) as an example, but you can follow the same flow with any Kubernetes distribution.
Conditions préalables
Before starting the tutorial, make sure you have:
- Access to a Google Cloud project with billing enabled.
- kubectl installed and configured on your machine (version compatible with your GKE cluster).
- Barre installed (v3+).
- Le Google Cloud CLI (
gcloud) installed and initialized (you can rungcloud auth loginetgcloud config listwithout errors). - Le
gke-gcloud-auth-plugininstalled and available in yourPATHso thatkubectlcan authenticate to GKE clusters. - Permissions in the target Google Cloud project to:
- create and manage GKE clusters (e.g. Kubernetes Engine Cluster Admin or equivalent),
- create and use Cloud Storage buckets if you plan to use GCS for data.
What you'll accomplish in this guide:
| Step | Task | Purpose |
|---|---|---|
| 1 | Create two GKE clusters | Set up master (control plane) and remote (job execution) |
| 2 | Install Ilum on master | Deploy Ilum's core components |
| 3 | Set up authentication | Create secure credentials for remote cluster access |
| 4 | Register remote cluster | Add cluster to Ilum's management interface |
| 5 | Configure networking | Enable communication between clusters |
| 6 | Run your first job | Verify the multi-cluster setup works |
Step 1. Provision Master and Remote GKE Clusters
The foundation of a multi-cluster setup consists of two distinct entities:
- Master Cluster: Hosts the Ilum control plane (UI, API, Scheduler).
- Remote Cluster: dedicated environment where Ilum executes the Spark Jobs dispatched from the master.
Créer un projet
- Open Google Cloud Console.
- Click the Project selector in the top-left corner.
- Cliquer New Project.
- Enter a project name and (if applicable) select an Organization/Folder.
- Cliquer Créer.
- Select the newly created project in the project selector.
Enable Google Kubernetes Engine API
- In the Console search bar, type Moteur Kubernetes.
- Open Moteur Kubernetes.
- Cliquer Activer to enable the Google Kubernetes Engine API for the selected project.
Switch to the chosen project in gcloud
- In the Console, open the project selector and copy the Project ID.
- In your terminal, set this project as active:
gcloud config poser project PROJECT_ID
- (Optional) If you plan to create clusters in a specific region often, set a default region:
gcloud config poser compute/region europe-central2
This avoids errors requiring --region / --zone.
Créer un cluster
Create the master cluster first:
gcloud container clusters create master-cluster \
  --type-machine=n1-standard-8 \
  --num-nodes=1
Create the remote cluster with a different name:
gcloud container clusters create remote-cluster \
  --type-machine=n1-standard-4 \
  --num-nodes=1
Resource Requirements & Architecture:
Why two clusters? The master cluster runs Ilum's control plane (UI, API, scheduler). The remote cluster executes your Spark jobs. This separation allows independent scaling and multi-cluster management from one interface.
Sizing:
- Master cluster: This example uses
n1-standard-8(8 vCPU, 30 GB RAM) for testing only. Minimum recommended: 12 vCPUs and 48 GB RAM (e.g.,n1-standard-12). Production environments with many users need significantly more. - Remote cluster: This example uses
n1-standard-4(4 vCPU, 15 GB RAM) for testing only. Production workloads require larger machines (e.g.,n1-standard-16+) and multiple nodes depending on your Spark job requirements.
Step 2. Install Ilum Control Plane on Master Cluster
Once your clusters are running, the next step is to deploy the Ilum platform on the master cluster.
Basculez vers la configuration du cluster maître dans kubectl
# obtenir les contextes kubectl et trouver celui avec votre cluster
kubectl config get-contexts
# switch to it using this command
kubectl config use-context MASTER_CLUSTER_CONTEXT
Créez un espace de noms et basculez-y dans kubectl
kubectl create namespace ilum
kubectl config set-context --current --namespace=ilum
Install Ilum using Helm charts:
helm repo ajouter ilum https://charts.ilum.cloud
helm install ilum -n ilum ilum/ilum
What just happened? You've installed Ilum's control plane on the master cluster. You can now access Ilum's interface to manage jobs across multiple clusters.
Step 3. Configure Authentication for Remote Cluster Access
Goal: Generate secure credentials (client certificates) that authorize the Ilum control plane to deploy and manage resources on the Cluster distant.
Important: All steps in this section must be performed while connected to the Cluster distant (not the master cluster).
Why this is needed:
When you created the remote cluster with gcloud, it was automatically added to your kubeconfig with your Google Cloud account credentials. However, Ilum doesn't have access to your Google account.
Ilum needs its own authentication method - client certificates - to connect to and manage the remote cluster. This section creates those certificates.
| Step | Action | Purpose |
|---|---|---|
| 1 | Create Client Key | Generate private key for authentication |
| 2 | Create CSR | Request identity verification from cluster |
| 3 | Register & Approve CSR | Cluster admin validates and signs request |
| 4 | Get Signed Certificate | Retrieve the "ID card" for Ilum |
| 5 | Grant Admin Permissions | Authorize Ilum to manage cluster resources |
| ✓ | Résultat | Ilum can securely manage the cluster |
This is similar to how kubectl authenticates to clusters, but we're doing it programmatically for Ilum.
Before you start: Make sure you're connected to the Cluster distant context:
kubectl config use-context gke_<your-project>_<region>_remote-cluster
You can verify with: kubectl config current-context
Step 3.1: Create a Client Key
What we're doing: Generating a private key that will be used for authentication.
First, create a dedicated directory for the certificates and work there:
mkdir -p ~/remote-cluster
cd ~/remote-cluster
Now generate the private key:
openssl genpkey -algorithm RSA -out client.key
Security: This private key is like a password. Keep client.key secure and never commit it to version control.
Step 3.2: Create Certificate Request
What we're doing: Creating a Certificate Signing Request (CSR) that asks the remote cluster to verify and sign our identity.
Remplacer myuser with the username of your choice:
openssl req -new -key client.key -out csr.csr -subj "/CN=myuser"
What is a CSR? A Certificate Signing Request asks the Kubernetes cluster to create a signed certificate for your user. The cluster will verify and sign it, creating a trusted identity.
Step 3.3: Encode the CSR
What we're doing: Converting the CSR to base64 format, which is required by Kubernetes.
cat csr.csr | base64 | tr -d '\n'
Copy the output - you'll need it in the next step.
Step 3.4: Register CSR in Kubernetes
What we're doing: Submitting the CSR to the remote cluster for approval.
Créer csr.yaml (replace myuser and paste your encoded CSR):
apiVersion: certificates.k8s.io/v1
gentil: CertificatSignatureDemande
métadonnées:
  nom: myuser  # Replace with your username
Spec:
  demander: <paste your base64 encoded CSR here>
  signerName: kubernetes.io/kube-apiserver-client
  Utilisations:
    - Authentification du client
Apply the CSR to the Cluster distant:
kubectl apply -f csr.yaml
Step 3.5: Approve and Retrieve the Certificate
What we're doing: As cluster admin, we approve our own CSR and retrieve the signed certificate.
Approve the CSR:
kubectl certificat approuver myuser
Retrieve the signed certificate:
kubectl get csr myuser -o jsonpath='{.status.certificate}' | base64 --decode > client.crt
What happened? You've registered your certificate request with Kubernetes, approved it (as cluster admin), and retrieved the signed certificate. This certificate + private key pair is now your authentication credential for the remote cluster.
Step 3.6: Get CA Certificate
What we're doing: Extracting the cluster's CA certificate. This will be needed for the optional test in the next section, and later in Step 4 when adding the cluster to Ilum.
Get and save the CA certificate:
kubectl vue config --minify --raw -o jsonpath='{.clusters[0].cluster.certificate-authority-data}' | base64 --decode > ca.crt
Verify the certificate was saved correctly:
openssl x509 -in ca.crt -text -noout | head -n 5
Why do we need this?
- CA Certificate: Verifies the cluster's identity (prevents man-in-the-middle attacks)
- Flags:
--minifygets only current context,--rawgets actual data instead of file paths
Step 3.7: Grant Permissions with Role Binding
What we're doing: Giving the certificate user (myuser) admin permissions on the remote cluster.
Créer rôlebinding.yaml:
apiVersion: rbac.authorization.k8s.io/v1
gentil: ClusterRoleBinding
métadonnées:
  nom: myuser-Admin-reliure
Sujets:
  - gentil: Utilisateur
    nom: myuser  # Match your username
    apiGroup: rbac.authorization.k8s.io
roleRef:
  gentil: ClusterRole
  nom: Grappe-Admin
  apiGroup: rbac.authorization.k8s.io
Apply the role binding to the Cluster distant:
kubectl apply -f rôlebinding.yaml
Security: We're granting cluster-admin for simplicity. In production, create a custom role with only the permissions Ilum needs:
- Create/delete pods, services, configmaps
- Read secrets
- Manage persistent volumes
Step 3.8: Configure Service Account Permissions
What we're doing: Granting permissions to the ServiceAccount that Spark pods will use.
What is a Service Account? It's the Kubernetes equivalent of a user for pods. Spark driver pods use it to create executor pods and manage resources in the cluster.
By default, pods use the faire défaut ServiceAccount in their namespace, but it doesn't have sufficient privileges to create other pods.
Créer sa_role_binding.yaml:
apiVersion: rbac.authorization.k8s.io/v1
gentil: ClusterRoleBinding
métadonnées:
  nom: ilum-faire défaut-Admin-reliure
roleRef:
  apiGroup: rbac.authorization.k8s.io
  gentil: ClusterRole
  nom: Grappe-Admin
Sujets:
  - gentil: ServiceAccount
    nom: faire défaut
    Namespace: ilum  # Namespace where Spark jobs will run
Apply the role binding to the Cluster distant:
kubectl apply -f sa_role_binding.yaml
Production Security: We're granting cluster-admin to the default ServiceAccount for simplicity. In production:
- Create a dedicated ServiceAccount (e.g.,
spark-driver) with minimal permissions - Specify it in your cluster configuration:
spark.kubernetes.authenticate.driver.serviceAccountName=spark-driver - Grant only the permissions needed: create/delete pods, read configmaps/secrets, etc.
(Optional) Test the Client Certificates
Why this step? This optional step verifies that the certificates work correctly before we give them to Ilum in Step 4.
We'll create a temporary kubectl context that uses the certificates (instead of your Google Cloud credentials) to confirm they have the correct permissions.
1. Verify certificates are in the directory:
All certificate files should already be in ~/remote-cluster/ from the previous steps:
ls ~/remote-cluster/
# You should see: ca.crt  client.crt  client.key  csr.csr  csr.yaml
2. Get your remote cluster name:
kubectl vue config -o jsonpath='{.clusters[*].name}' | tr ' ' '\n' | grep lointain
You should see something like: gke_my-project_europe-central2_remote-cluster
Copy this cluster name.
3. Add the certificate-based user to kubectl:
kubectl config set-credentials myuser-cert \
  --client-certificate=$HOME/remote-cluster/client.crt \
  --client-key=$HOME/remote-cluster/client.key
This creates a new user in your kubeconfig that uses certificates instead of your Google account.
4. Create a test context:
kubectl config set-context test-remote-certs \
  --cluster=<paste-your-remote-cluster-name-here> \
  --namespace=faire défaut \
  --user=myuser-cert
Remplacer <paste-your-remote-cluster-name-here> with the cluster name from step 2.
5. Test the certificate-based authentication:
kubectl config use-context test-remote-certs
kubectl get pods
Expected output:
Aucune ressource n’a été trouvée dans l’espace de noms par défaut.
If you see this (or a list of pods), the certificates work! ✅
6. Switch back to your normal context:
# Find your original context
kubectl config get-contexts

# Switch back (replace with your actual context name)
kubectl config use-context gke_<your-project>_<region>_remote-cluster
What we just verified: The client certificates can successfully authenticate to the remote cluster with admin permissions. In Step 4, we'll provide these same certificates to Ilum so it can manage the cluster.
Step 4. Register the Remote Cluster in Ilum UI
With your certificates generated and permissions granted, you are now ready to connect the remote cluster to the Ilum control plane.
What you'll provide: All the credentials and connection details you created in Step 3:
| Item | File/Value | Purpose |
|---|---|---|
| CA Certificate | ca.crt | Verifies cluster identity |
| Client Certificate | client.crt | Your authentication credential |
| Client Key | client.key | Private key for authentication |
| URL du serveur | From kubectl | Cluster API endpoint |
| Username | myuser | User identity |
Access Ilum UI
Before you can add the remote cluster to Ilum, you need to access the Ilum web interface.
1. Switch to the master cluster context:
kubectl config use-context gke_<your-project>_<region>_master-cluster
You can verify with: kubectl config current-context
2. Set up port forwarding to Ilum UI:
kubectl port-forward -n ilum svc/ilum-ui 9777:9777
Keep this terminal window open - it needs to run continuously.
3. Open Ilum in your browser:
Open http://localhost:9777 in your web browser.
4. Log in:
- Username:
Admin - Password:
Admin
Now you're ready to add the remote cluster to Ilum!
Demo: Adding a Kubernetes Cluster
Aller à la page de création de cluster
- Accédez à la section Clusters dans la charge de travail
- Cliquer Nouveau cluster bouton
Spécifiez les paramètres généraux :
- Choisissez le nom et la description de votre choix.
- Définir le type de cluster sur Kubernetes
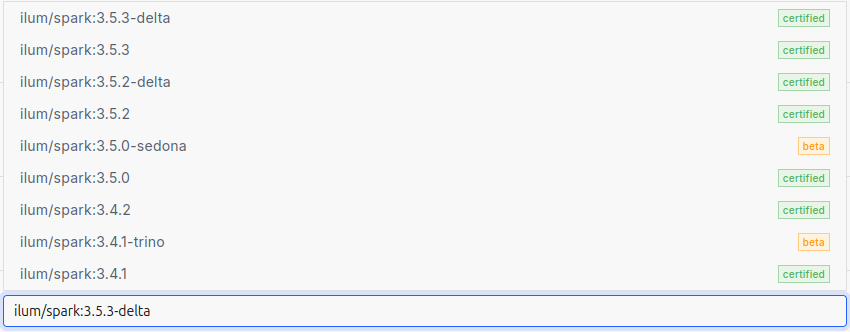
- Choisissez une version d’étincelle
La version de Spark est spécifiée en sélectionnant une image pour les tâches Spark.
Ilum nécessite l’utilisation de ses propres images, qui incluent toutes les dépendances nécessaires préinstallées.
Voici une liste de toutes les images disponibles :
Spécifier les configurations d’étincelle
Les configurations Spark que vous spécifiez au niveau du cluster seront appliquées à chaque tâche Ilum déployée sur ce cluster.
Cela peut être utile si vous voulez éviter de répéter les configurations. Par exemple, si vous utilisez Iceberg comme catalogue Spark, vous pouvez le configurer une fois au niveau du cluster, puis tous les travaux Ilum déployés sur ce cluster utiliseront automatiquement ces configurations.
Important: Set the namespace for Spark jobs
Dans le Paramètres section, add:
spark.kubernetes.namespace: ilum
This ensures all Spark jobs run in the ilum namespace where you created the external services (ilum-core, ilum-grpc, ilum-minio) in Step 5. Without this, jobs would run in faire défaut namespace and couldn't connect to master cluster services.
Ajouter des rangements
Default cluster storage will be used by Ilum to store all the files required to run Ilum Jobs both provided by user and by Ilum itself.
You can choose any type of storage: S3, CGV, WASBS, HDFS.
For detailed instructions on setting up storage (especially GCS), see the Créer du stockage guide.
Quick setup in the UI:
- Cliquez sur le bouton « Ajouter de l’espace de stockage » bouton
- Specify the name and choose the storage type (S3, GCS, etc.)
- Choisir Godet d’étincelles - seau principal utilisé pour stocker les fichiers Ilum Jobs
- Choisir Compartiment de données - requis si vous utilisez le format Ilum Tables spark
- Specify storage endpoint and credentials
- Cliquez sur le bouton « Soumettre » bouton
Vous pouvez ajouter n’importe quel nombre de stockages, et les travaux Ilum seront configurés pour utiliser chacun d’entre eux.
Allez dans la section Kubernetes et spécifiez les configurations kubernetes
Ici, nous fournissons à Ilum tous les détails nécessaires pour se connecter à notre cluster Kubernetes. Le processus est similaire à la connexion au cluster via l’outil kubectl, mais ici, il s’effectue via l’interface utilisateur.
You will need to provide the following:
| Field | What to provide | File location |
|---|---|---|
| Url | Cluster API endpoint (text field) | ⚠️ Switch to remote cluster first, then: kubectl config view --minify -o jsonpath='{.clusters[0].cluster.server}' |
| CaCert | Upload CA certificate file | ~/remote-cluster/ca.crt (from Step 3.6) |
| ClientKey | Upload client private key file | ~/remote-cluster/client.key (from Step 3.1) |
| ClientCert | Upload client certificate file | ~/remote-cluster/client.crt (from Step 3.5) |
| Username | Username (text field) | myuser (or whatever you used in Step 3.2) |
Once you have specified these items, Ilum will be able to access your Kubernetes cluster.
De plus, vous pouvez :
- Configurer Kubernetes pour qu’il nécessite un mot de passe pour votre utilisateur. Dans ce cas, vous devrez spécifier le mot de passe ici dans l’interface utilisateur.
- Ajoutez un phrase de passe lors de la création de la clé client. Si vous l’avez fait, vous devrez spécifier la phrase de passe ici dans l’interface utilisateur.
- Spécifiez l’icône Algorithme clé utilisé dans le client.key. Ce n’est pas obligatoire, car ces informations sont généralement stockées dans la clé elle-même. Cependant, il peut y avoir des cas où vous devez le définir explicitement.
Enfin, vous pouvez cliquer sur l’icône Envoyer pour ajouter un cluster.
Enfin, vous pouvez cliquer sur l’icône Envoyer pour ajouter un cluster.
Step 5. Configure Multi-Cluster Networking
The Challenge: While Ilum can now dispatch jobs to the remote cluster, those jobs need a way to report their status, logs, and metrics back to the master cluster.
Why jobs need to communicate:
| Component | Action | Target Service | Emplacement |
|---|---|---|---|
| Spark Jobs | Send status updates | Ilum Core (gRPC) | Master Cluster |
| Spark Jobs | Send metrics & logs | MinIO Event Log | Master Cluster |
| Scheduled Jobs | Trigger new jobs | Noyau d’Ilum | Master Cluster |
The Solution: Expose Ilum's services from the master cluster and create DNS aliases in the remote cluster.
Step 5.1: Configure Firewall
Tout d’abord, vous devez autoriser le trafic entrant dans votre cluster maître GKE. Le projet Google Cloud dont l’accès au trafic est géré par son pare-feu. Le pare-feu peut être géré par des règles. Pour permettre à remote-cluster d’accéder aux services de master-cluster, nous devons ajouter cette règle à Le projet de notre Master-Cluster :
gcloud compute firewall-rules create allow-ingress-traffic \
  --network faire défaut \
  --direction INGRESS \
  --action ALLOW \
  --rules tcp:80,tcp:443 \
  --source-ranges 0.0.0.0/0 \
  --description "Allow HTTP/HTTPS"
Security Warning: --source-ranges 0.0.0.0/0 allows traffic from anywhere. In production, restrict this to your remote cluster's IP range:
--source-ranges 10.0.0.0/8 # Example: your cluster's CIDR
Step 5.2: Expose Services from Master Cluster
What is LoadBalancer? It's a Kubernetes service type that provisions a public IP address, making the service accessible from outside the cluster (including from your remote cluster).
Vous devez exposer les services du cluster maître au monde extérieur. Pour ce faire, remplacez leur type par LoadBalancer. Ilum simplifie ce processus à l’aide de configurations Helm.
To expose Ilum Core, gRPC, and MinIO to the outside world, run the following command in your terminal:
helm upgrade ilum -n ilum ilum/ilum \
  --poser ilum-core.service.type="LoadBalancer" \
  --poser ilum-core.grpc.service.type="LoadBalancer" \
  --poser minio.service.type="LoadBalancer" \
  --reuse-values
Après cela, vous devez attendre quelques minutes, puis vérifier vos services en exécutant
kubectl obtenir des services
Pour voir ceci :
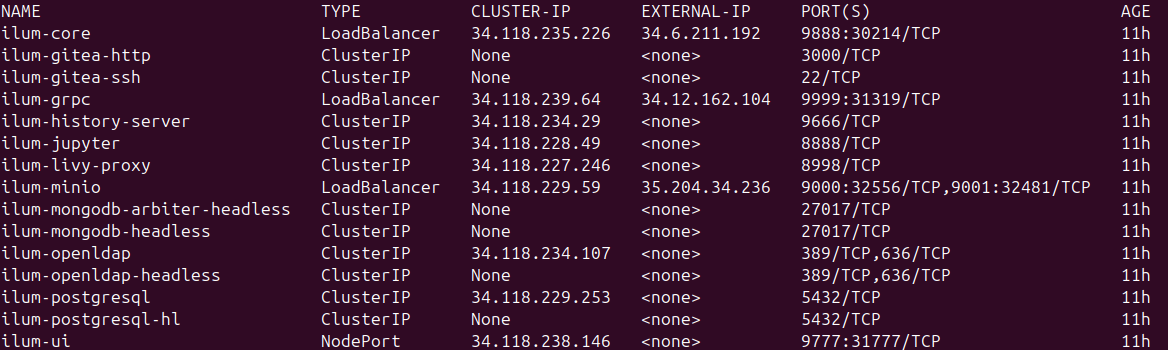
Here you can notice the ilum-core, ilum-grpc and minio services changed their type to LoadBalancer and got public IP.
Now you can go to http://<public-ip>:9888/api/v1/group pour vérifier si tout va bien.
Step 5.3: Create External Services in Remote Cluster
What is ExternalName? It creates a local DNS alias in the remote cluster. When a job tries to connect to noyau d’aluminium :9888, Kubernetes redirects it to the public IP. Jobs use familiar service names as if everything was in one cluster.
Switch to remote cluster context:
Before creating external services, make sure you're working on the Cluster distant:
kubectl config use-context gke_<your-project>_<region>_remote-cluster
Créer external_services.yaml in the remote cluster:
Use the EXTERNAL-IP addresses from the kubectl obtenir des services output in your master cluster (the public IPs shown in the screenshot above). Replace the placeholders below with these actual IP addresses.
apiVersion: v1
gentil: Service
métadonnées:
  nom: ilum-noyau
  Namespace: ilum  # Must match the namespace where jobs will run
Spec:
  type: ExternalName
  nom_externe: 34.118.72.123  # Replace with actual EXTERNAL-IP from master cluster
  Ports:
    - port: 9888
      targetPort: 9888

---
apiVersion: v1
gentil: Service
métadonnées:
  nom: ilum-GRPC
  Namespace: ilum  # Must match the namespace where jobs will run
Spec:
  type: ExternalName
  nom_externe: 34.118.72.124  # Replace with actual EXTERNAL-IP from master cluster
  Ports:
    - port: 9999
      targetPort: 9999

---
apiVersion: v1
gentil: Service
métadonnées:
  nom: ilum-minio
  Namespace: ilum  # Must match the namespace where jobs will run
Spec:
  type: ExternalName
  nom_externe: 34.118.72.125  # Replace with actual EXTERNAL-IP from master cluster
  Ports:
    - port: 9000
      targetPort: 9000
Before applying:
- Replace the example IPs (
34.118.72.123, etc.) with your actual EXTERNAL-IP addresses Dekubectl obtenir des servicesin the master cluster - Make sure the
namespace: ilummatches the namespace where your Spark jobs will run in the remote cluster - If you haven't created the
ilumnamespace in the remote cluster yet, create it first:Create Namespacekubectl create namespace ilum
Apply the external services:
kubectl apply -f external_services.yaml
Multi-Cluster Bridge Complete: Jobs running on the remote cluster can now reach Ilum's services on the master cluster using familiar service names (ilum-core, ilum-grpc, ilum-minio), even though they're actually connecting over the internet via public IPs.
Components in Multi-Cluster Architecture
Components compatible with multi-cluster (with additional networking):
| Component | Purpose | Requires Exposure |
|---|---|---|
| Ruche Metastore | Metadata management for tables | ✅ Yes |
| Márquez | Data lineage tracking | ✅ Yes |
| Serveur d’historique | Spark application history | ✅ Yes |
| Graphite | Metrics collection | ✅ Yes |
Components restricted to single-cluster:
| Component | Raison |
|---|---|
| Pile Kube Prometheus | Prometheus needs direct pod access for metrics scraping. Challenging with dynamic pods across clusters. |
| Loki et Promtail | Promtail collects logs similarly to Prometheus. Same multi-cluster limitations. |
All other Ilum services not listed above are cluster-independent and work in both single- and multi-cluster setups.
Step 6. Verify the Multi-Cluster Setup
The final step is to validate your configuration by running a real Spark job on the remote cluster.
Step 1: Access Ilum UI
-
Switch to master cluster context:
kubectl config use-context gke_<your-project>_<region>_master-cluster -
Set up port-forwarding:
kubectl port-forward -n ilum svc/ilum-ui 9777:9777Keep this terminal window open.
-
Open Ilum in browser:
- Navigate to
http://localhost:9777 - Login with default credentials:
admin :admin
- Navigate to
Step 2: Create a Test Job
-
Navigate to Jobs section in Ilum UI
-
Click "New Job +" bouton
-
Configure the job:
- Nom:
RemoteClusterTest - Job Type:
Spark Job - Cluster: Select your Cluster distant (not master)
- Classe:
org.apache.spark.examples.SparkPi - Language:
Scala
- Nom:
-
Add Resources:
- Atteindre Ressources tab
- Jars: Upload one of these:
- Spark 4 / Scala 2.13 (default): spark-examples_2.13-4.1.1.jar
- Spark 3 / Scala 2.12: spark-examples_2.12-3.5.8.jar
-
Submit the job
Step 3: Verify Execution
If everything is configured correctly:
✅ Job starts successfully - Pods are created in the remote cluster
✅ Logs appear - You can see Spark initialization and execution logs
✅ Job completes - Final output shows: Pi is roughly 3.14...
Check remote cluster pods:
kubectl config use-context gke_<your-project>_<region>_remote-cluster
kubectl get pods -n ilum
You should see Spark driver and executor pods running or completed.
For detailed job configuration options, see the Run Simple Spark Job guide.
Troubleshooting & FAQ
Here are solutions to common issues you might encounter when connecting a remote GKE cluster.
Why is my Spark Job stuck in "Pending" state?
This usually happens if the remote cluster lacks resources or can't pull images.
- Check Resources: Ensure your node pool has enough CPU/RAM.
- Check Events: Run
kubectl get events -n ilumon the remote cluster to see scheduling errors.
Why can't the remote cluster connect to Ilum Core?
If the job runs but fails to report status:
- Verify Firewall: Ensure the master cluster's firewall allows ingress on ports 9888 (Core), 9999 (gRPC), and 9000 (MinIO).
- Check DNS: Verify the
ExternalNameservices in the remote cluster resolve to the master's public IP.
Can I use a private GKE cluster?
Yes, but you will need to configure VPC Peering or a VPN between the master and remote networks instead of using public LoadBalancers.
Next Steps
Congratulations! You've successfully set up a robust multi-cluster Ilum environment. You can now:
- Deploy Spark jobs to your remote cluster from the Ilum UI
- Monitor job execution across all clusters from one interface
- Scale horizontally by adding more remote clusters using the same process
- Optimize costs by using different machine types for different workloads
Production Checklist:
- Restrict firewall rules to specific IP ranges
- Create custom RBAC roles instead of cluster-admin
- Set up TLS certificates for LoadBalancer services
- Configure resource quotas and limits
- Activer monitoring and alerting
- Document your cluster configurations