JupyterHub à Ilum
Enterprise Feature: JupyterHub is an enterprise feature in Ilum and requires a valid enterprise license to function. It will not work with the standard open-source license.
Table des matières
- Aperçu
- Architecture
- Authentification et autorisation LDAP
- Intégration Gitea (ordinateurs portables à version contrôlée)
- Déploiement de JupyterHub via Helm (configuration et secrets)
- Opérateur Gitea à l’intérieur de JupyterHub (détails DevOps)
- Guide de première connexion pour les utilisateurs
Aperçu
JupyterHub à Ilum fournit un environnement de bloc-notes Jupyter multi-utilisateurs étroitement intégré à la plate-forme Ilum. Il permet à plusieurs utilisateurs de se connecter et de générer leurs propres instances Jupyter isolées sur un cluster Kubernetes, le tout géré par un service JupyterHub central. Contrairement à un JupyterLab (qui est un IDE web mono-utilisateur pour les notebooks), JupyterHub agit comme un Couche d’orchestration multi-utilisateurs. Chaque utilisateur qui se connecte dispose d’un serveur JupyterLab dédié (son espace de travail personnel) qui s’exécute à l’intérieur du cluster, tandis que JupyterHub gère l’authentification, l’apparition et la gestion des ressources de manière centralisée. Cela signifie que les équipes de science des données peuvent partager une infrastructure commune, tout en travaillant dans des environnements de blocs-notes distincts.
Les principales fonctionnalités ajoutées par JupyterHub à Ilum sont les suivantes :
-
Prise en charge multi-utilisateurs : Les utilisateurs s’authentifient (via des informations d’identification LDAP) et chacun reçoit un espace de travail Jupyter isolé s’exécutant dans un espace Kubernetes. JupyterHub gère ces pods d’utilisateurs et s’assure qu’ils sont séparés en toute sécurité. Cela élimine le besoin d’installations locales de Jupyter et permet aux organisations d’héberger des blocs-notes pour de nombreux utilisateurs en un seul endroit.
-
Intégration Spark : Ilum’s JupyterHub comes pre-integrated with Apache Spark. Each environment is configured with Magie étincelante et se connecte au cluster Ilum Spark via le Ilum Livy-proxy service. Cela signifie que vous pouvez exécuter des tâches Spark directement à partir de vos blocs-notes, en utilisant la magie Sparkmagic (
%manage_spark,%%étincelle) to create and manage Spark sessions. The Spark jobs execute on the cluster (not on the notebook container), leveraging Ilum’s interactive Spark session backend. By using Ilum’s Livy-compatible API, Jupyter can run heavy Spark computations while offloading the work to the Spark cluster, seamlessly integrating big data processing into your notebooks. -
Contrôle de version intégré avec gitea : Every user’s notebook workspace is backed by a personal Git repository on Ilum’s integrated Gitea service. On first login, a repository is automatically created and initialized with template notebooks and directory structure. Users can version their code, track changes, and collaborate by pushing commits to this repo. This Git integration is unique to Ilum’s JupyterHub setup – it ensures that notebook content isn’t just saved on a disk, but is also version-controlled and accessible through a Git web interface.
-
Différences par rapport au JupyterLab standard : From an end-user perspective, working in JupyterHub’s interface will feel the same as regular JupyterLab (you can write code, execute cells, install packages, etc.). However, under the hood JupyterHub adds enterprise features: central authentification, Isolation multi-utilisateurs, Gestion des ressources partagéeset intégration avec d’autres Ilum services. In Ilum, JupyterHub is not just an editor – it’s part of a larger ecosystem that includes LDAP-based access control, shared Spark clusters, and DevOps-managed infrastructure. This contrasts with a standalone JupyterLab where you operate on local resources with a single user context. In summary, JupyterLab est l’interface utilisateurtandis que JupyterHub is the service that makes it multi-user and connected to Ilum’s cluster resources.
Architecture
Architecture de l’intégration de JupyterHub dans Ilum.
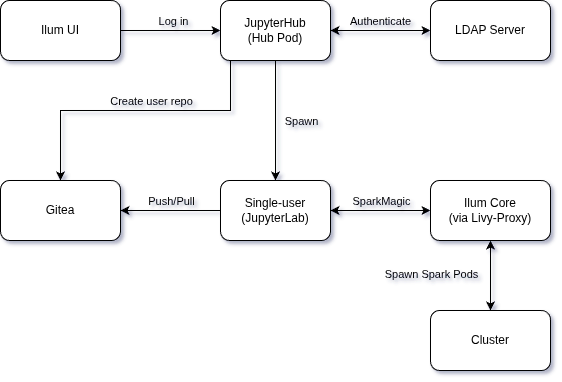
Le schéma ci-dessus illustre comment JupyterHub dans Ilum se connecte à divers composants :
-
Service JupyterHub (Hub Pod) : Le hub central s’exécute dans le cluster Kubernetes dans le cadre d’Ilum. Il inclut le processus JupyterHub et un Opérateur Gitea à l’intérieur de JupyterHub. Le Hub est configuré pour utiliser LDAP pour l’authentification des utilisateurs et génère des serveurs de blocs-notes utilisateur à la demande.
-
Serveur monoposte (JupyterLab Pod) : When a user logs in, JupyterHub launches a dedicated pod running a single-user Jupyter server for that user. Users interact with this Jupyter interface to run notebooks. Each user pod is isolated and has access only to that user’s data (including their Git repo and any persistent volume for notebooks).
-
Serveur LDAP (Authentification et autorisation) : JupyterHub nécessite un annuaire LDAP externe (ou un service LDAP déployé aux côtés d’Ilum) pour l’authentification des utilisateurs. Lorsqu’un utilisateur tente de se connecter à JupyterHub, celui-ci communique avec le serveur LDAP configuré pour vérifier le nom d’utilisateur et le mot de passe. Seuls les utilisateurs qui réussissent l’authentification LDAP (et qui répondent à certains critères d’appartenance à un groupe, le cas échéant) sont autorisés. En effet, LDAP agit comme la source unique de vérité pour les identités et les informations d’identification des utilisateurs dans les services Ilum.
-
Gitea Git Service (contrôle de version) : Ilum includes an internally hosted Git service (Gitea). JupyterHub’s Opérateur Gitea monitors the cluster for events such as new user pods starting. On a user’s first login, the operator uses Gitea’s API to provisionner un dépôt et une équipe Git for the user. The user’s notebook pod will then perform an initialization sync: it uses Git (over HTTP) to pull in template notebooks from the new repo. This sync uses the user’s LDAP credentials or a configured service account to authenticate to Gitea. After initialization, the user’s environment has a checked-out copy of their repository (with starter notebooks in place), and any changes the user makes can be committed and pushed back to Gitea. (Details in Intégration Gitea ci-dessous.)
-
Ilum Core Services (API Livy-Proxy) : Ilum's core (the central management component of Ilum) provides an API for interactive Spark sessions, exposed via the ilum-livy-proxy service. Jupyter notebooks communicate with this service when the user runs Spark code. The Sparkmagic extension in Jupyter is preconfigured with an endpoint pointing to the Livy-proxy (
http://ilum-core:9888internally). When a user creates a Spark session from the notebook, Sparkmagic contacts Ilum's Livy-proxy, which in turn instructs Ilum Core to launch a Spark driver (and executors) for that user's session. The Spark jobs then run on the Spark Cluster. Ilum Core manages these Spark pods and links them to the user's context. In practice, this means a user can click "Create Spark Session" in Jupyter and behind the scenes a full Spark context is provisioned on the cluster – all without leaving the notebook interface. -
Ilum UI et autres services : JupyterHub est intégré à l’interface utilisateur d’Ilum en tant que module. Par exemple, à partir de l’interface web d’Ilum, vous pouvez accéder à Modules > JupyterHub to open JupyterHub. The Ilum UI can optionally proxy to JupyterHub so that users who are already logged into Ilum can quickly reach the Jupyter interface. (By default, JupyterHub has its own login page and session management distinct from the Ilum UI – though using the same LDAP backend for credentials.)
En résumé, le JupyterHub d’Ilum se trouve à la croisée des chemins authentification (LDAP), Données et code (Gitea)et calcul (Spark via Ilum Core). L’architecture garantit que lorsqu’un utilisateur démarre un bloc-notes, il est validé par rapport à un répertoire central, dispose d’un environnement de bloc-notes prêt à l’emploi avec contrôle de version et accède en un clic à la puissance de calcul distribuée.
Authentification et autorisation LDAP
Ilum’s JupyterHub uses LDAP pour l’authentification (vérification des informations d’identification de l’utilisateur) et l’autorisation (contrôle de l’accès au service). Cela signifie que les utilisateurs doivent avoir un compte dans l’annuaire LDAP configuré, et JupyterHub liaison à LDAP pour vérifier le nom d’utilisateur/mot de passe au moment de la connexion. Il y a quelques aspects importants dans la façon dont l’intégration LDAP est configurée dans Ilum :
-
LDAP est requis : Vous doit disposer d’un serveur LDAP configuré for JupyterHub to function in Ilum. Ilum does not support JupyterHub with simple internal accounts or OAuth at this time – the hub is tightly integrated with LDAP for consistency with enterprise deployments. If you don’t already have an LDAP server, you can deploy one (for example, an OpenLDAP instance) as part of your Kubernetes environment. In fact, Ilum’s Helm charts allow you to deploy a test OpenLDAP as a dependency in non-production setups. See the LDAP Security documentation for a comprehensive guide to setting up LDAP, including sample LDIFs and Helm values.
-
Configuration Helm pour LDAP : Tous les détails de connexion et les requêtes pour LDAP sont fournis via des valeurs Helm. Au minimum, vous devrez définir :
- URL(s) du serveur LDAP et DN de base.
- Un DN de liaison et un mot de passe (si votre LDAP nécessite un compte de service pour la recherche).
- Base de recherche et filtre pour les utilisateurs, ainsi que l’attribut à utiliser comme nom d’utilisateur.
- La base de recherche et le filtre pour les groupes (si vous utilisez des restrictions basées sur les groupes).
Par exemple, pour activer LDAP dans Ilum, vous pouvez inclure des paramètres tels que les suivants dans votre commande de mise à niveau/installation Helm (cet exemple utilise des valeurs d’espace réservé) :
Mise à niveau Helm --install ilum ilum/ilum \
    --poser ilum-core.security.type=« LDAP » \
    --poser ilum-core.security.ldap.urls[0]="ldap://ilum-openldap:389" \
    --poser ilum-core.security.ldap.base="dc=ilum,dc=cloud" \
    --poser ilum-core.security.ldap.username="cn=admin,dc=ilum,dc=cloud" \
    --poser ilum-core.security.ldap.password="<bind-password>" \
    --poser ilum-core.security.ldap.userMapping.base=« ou=personnes » \
    --poser ilum-core.security.ldap.userMapping.filter=« uid={0} » \
    --poser ilum-core.security.ldap.groupMapping.base="ou=groups" \
    --poser ilum-core.security.ldap.groupMapping.filter=« (membre={0}) »
Dans ce qui précède, security.type="LDAP » switches Ilum to LDAP mode, and the other values supply the connection info and queries (UID filter, group filter, etc.). These should be adjusted to match your directory’s schema and structure.
-
Groupes LDAP autorisés : Typically, you may not want every LDAP user to use JupyterHub, so Ilum’s JupyterHub supports restricting access to specific groups. You can configure an Groupes autorisés dans l’authentificateur LDAP JupyterHub. Cela se fait en fournissant le DN complet d’un ou plusieurs groupes ; Seuls les utilisateurs membres d’au moins un de ces groupes pourront se connecter. Techniquement, le graphique de Helm définit le
jupyterhub.hub.config.LDAPAuthenticator.allowed_groupspar le numéro de série du groupe que vous spécifiez. Par exemple, si vous ne voulez que les membres decn=datascientist,ou=subgroups,dc=ilum,dc=cloudJupyterHub effectuera ensuite une requête LDAP pour s’assurer que l’utilisateur qui se connecte est membre de ce groupe avant d’autoriser l’accès. (Si allowed_groups n’est pas défini, tout utilisateur LDAP valide peut se connecter par défaut.) -
Mappage des attributs utilisateur : As part of LDAP integration, Ilum maps certain LDAP attributes onto the user’s Jupyter environment. For instance, the uid attribute is used as the JupyterHub username (and as the directory name for the user’s workspace). Attributes like nom complet (par exemple cn ou displayName ) et Messagerie électronique ( mail ) are pulled from LDAP and can be used for the user’s Git configuration and in the Ilum UI. Under the hood, Ilum’s configuration allows specifying which LDAP attributes correspond to Ilum user fields – e.g., mapping mail -> email, cn -> full name. When a user logs in, these mappings ensure that the Jupyter environment “knows” the user’s name and email. In practice, the JupyterHub spawner might set the Git client config inside the container using this info (so that any commits the user makes will carry their correct name/email). It also means the Ilum platform can show the proper identity for notebook servers.
The LDAP bind password and other credentials should be treated as sensitive secrets. It’s recommended to supply them via your Helm values (or a Kubernetes Secret) and non Archivez-les dans le contrôle de code source. L’exemple ci-dessus montre --set ilum-core.security.ldap.password="psswd » à titre d’illustration, mais dans un déploiement réel, vous utiliseriez une valeur sécurisée. Assurez-vous que votre connexion LDAP est sécurisée (par exemple, utilisez LDAPS et fournissez les certificats appropriés, comme indiqué dans la documentation Ilum pour la configuration LDAPS).
Finally, because JupyterHub is tightly coupled with LDAP in Ilum, if LDAP is not configured correctly, users will not be able to log in to notebooks. Always verify your LDAP settings by logging into the main Ilum UI first. Once Ilum core authentication via LDAP is confirmed working, JupyterHub should also be able to authenticate users (since it uses the same underlying config). If you need to troubleshoot JupyterHub LDAP issues, you can inspect the JupyterHub pod logs for authentication errors – it will typically log LDAP connection attempts and any filter mismatches.
For detailed LDAP configuration, see the LDAP Security documentation for comprehensive guidance on LDAP setup, including SSL/TLS configuration, attribute mapping, and synchronization options.
Intégration Gitea (ordinateurs portables à version contrôlée)
L’une des caractéristiques les plus remarquables de JupyterHub dans Ilum est son intégration intégrée avec Gitea, Ilum’s lightweight Git service. This integration ensures that every user’s notebooks and code are version-controlled from the moment they start using Jupyter. Here’s how it works and what happens on a user’s first login:
-
Dépôt Git personnel pour chaque utilisateur : Lors de la première connexion, l’opérateur Gitea (fonctionnant à l’intérieur du pod JupyterHub) créera un Nouveau référentiel dans Gitea pour l’utilisateur. En règle générale, ce dépôt est privé pour l’utilisateur (bien qu’il puisse choisir de le partager plus tard). Le référentiel peut être créé sous un Gitea particulier organisation or namespace designated for Ilum notebooks, or simply under the user’s account – but in either case, it’s the user’s personal repository pour leurs carnets et fichiers Jupyter. Pour plus de clarté organisationnelle, l’opérateur crée également un équipe dans Gitea et lui attribue l’utilisateur, en s’assurant que seuls cet utilisateur (et les administrateurs) ont accès au nouveau dépôt. En effet, chaque utilisateur obtient leur propre équipe et leur propre dépôt on the Gitea server on first login (this is done to encapsulate permissions – e.g., the team could correspond to an Ilum Group or just serve to isolate access)
-
Modèles de blocs-notes initiaux : Ilum peut pré-remplir les nouveaux dépôts avec du contenu de modèle. Le graphique helm inclut des ConfigMaps ou des fichiers de modèle qui contiennent Carnets de notes, structure de répertoires et fichiers de configuration de démarrage qui sont utiles pour les nouveaux utilisateurs. Par exemple, vous pourriez trouver un
IlumIntro.ipynbnotebook, des exemples de notebooks Spark ou une disposition de dossier spécifique dès que vous vous connectez. Ces fichiers proviennent d’une ConfigMap Kubernetes (définie dans le graphique Helm) et sont copiés dans l’environnement JupyterHub lors de l’initialisation. Legit-init-repoinit container will perform a Git commit to add these templates to the user’s repo on first setup.
First Login Workflow
Lorsqu’un utilisateur se connecte à JupyterHub pour la première fois :
-
JupyterHub authentifie l’utilisateur via LDAP.
-
Le Hub spawns the user’s notebook pod. Cet espace démarre le serveur Jupyter mono-utilisateur.
-
Simultanément, le L’opérateur Gitea détecte that a new Jupyter notebook pod was created (for a user that likely has no repo yet). It then calls the Gitea API (using a special admin account) to set up the repository and access rights for that user. (If the user does not yet exist in Gitea’s database, the operator may trigger the creation of the user account as well. In many cases, Gitea is configured with LDAP authentication too, so the user can use the same credentials on the Gitea web interface – but an initial entry might be created via API to attach them to the repo/team.)
-
Une fois le référentiel créé, un init process in the user’s pod syncs the content. Typically, this involves setting up Git inside the notebook container and cloning the empty repository from Gitea into the user’s workspace, then copying the template files into it, git add/commit, and pushing back to Gitea.
In either case, the user’s LDAP credentials are used for the Git operation (so that the commit is attributed to the user and the push is authenticated). Since Gitea is running internally, the Helm chart knows the Gitea service address (e.g., ilum-gitea-http:3000 ) and uses the provided Nom d’utilisateur/mot de passe Git to perform the Git push. After this step, the user’s repository in Gitea is no longer empty – it contains the starter notebooks from the template. The user’s Jupyter file browser will show these files immediately, because they’ve been pulled into the pod’s filesystem. The user server finishes launching and the user can now interact with the notebook UI. From their perspective, they see a pre-populated workspace and can begin working with the provided examples or create new notebooks.
Utilisation continue et synchronisation : Après la première initialisation, le référentiel appartient à l’utilisateur. Il y a Pas de synchronisation forcée continue à partir des modèles – the templates are applied only once. Users are expected to use Git to manage their work going forward. This means any new notebooks they create or changes they make are not automatically pushed to Gitea unless they commit and push. Ilum’s JupyterLab comes with the Extension Git JupyterLab installé (accessible via l’icône Git dans la barre latérale), ce qui facilite la validation des modifications et le push/pull dans l’interface Jupyter. Les utilisateurs peuvent également ouvrir un terminal dans Jupyter et utiliser les commandes git manuellement. L’origine distante est déjà configurée pour pointer vers son référentiel personnel sur le serveur Ilum Gitea.
Collaboration et partage : By default, each user’s repo is private to them (plus any Ilum admin). If a user wants to share a notebook, they can accorder l’accès via Gitea (par exemple, inviter un collaborateur à son dépôt ou exporter des blocs-notes). Cette intégration étroite de Git signifie que les meilleures pratiques telles que la révision de code et le suivi des versions peuvent être appliquées aux notebooks.
Structure du référentiel : La structure exacte du dépôt initialisé peut être personnalisée via les valeurs Helm (à l’aide de ConfigMaps ou en créant une image Jupyter personnalisée). Les modèles courants consistent à inclure un dossier pour les exemples de carnets (par exemple, work/ ). Cela donne des conseils aux nouveaux utilisateurs et garantit une structure de projet cohérente dans toute l’organisation.
Conseil pour les utilisateurs :
Après votre première connexion, votre serveur de bloc-notes est déjà lié à un référentiel Git.When you click the “Save” button in Jupyter, your changes are saved only to your personal persistent storage (PVC) on the cluster. Cela signifie que toutes les modifications et les nouveaux notebooks restent disponibles dans votre espace de travail, même si votre serveur est redémarré, tant que vos données utilisateur ne sont pas supprimées.
Si vous souhaitez sauvegarder vos modifications dans votre dépôt Git (hébergé sur Gitea) ou les partager avec d’autres, vous devez utiliser l’intégration Git dans JupyterLab :
- Ouvrez le panneau Git (dans la barre latérale gauche).
- Échelonnez les modifications, ajoutez un message de validation et validez votre travail.
- Click “Push” to upload your commits to the central Git server.
Se souvenir: Seuls les fichiers qui ont été validés et poussés vers Git seront sauvegardés dans votre dépôt et sauvegardés sur Gitea. Si votre serveur de bloc-notes est supprimé ou si vous devez restaurer votre environnement, vous pouvez toujours extraire vos derniers commits du référentiel Git. L’utilisation de Git vous permet également de revenir à des versions antérieures de vos blocs-notes et de collaborer avec d’autres personnes via des branches ou des demandes de tirage.
En résumé, l’intégration de Gitea dans Ilum transforme votre espace de travail Jupyter en un référentiel de projet contrôlé par version dès le départ. Cela encourage la reproductibilité et la collaboration, et s’aligne sur GitOps principles (even for notebooks). Data scientists can treat notebooks as code – committing changes, writing commit messages, and using branches or pull requests for major updates – all while staying within the comfortable Jupyter environment.
Déploiement de JupyterHub via Helm (configuration et secrets)
Dans le helm aio chart, ilum-jupyterhub est disabled by default. You must explicitly enable it and configure LDAP for it to function.
To successfully deploy JupyterHub, you must enable the service and configure the LDAP connection details for both Ilum Core and Gitea.
1. Enable and Configure LDAP
You must provide your LDAP server details. If you do not have an existing LDAP server, you can enable the bundled OpenLDAP service (which is also disabled by default) for testing purposes.
Exemple valeurs.yaml configuration:
# 1. Enable the bundled OpenLDAP service (for testing/demo only)
openLDAP:
  Activé: vrai

# 2. Configure Ilum Core to use LDAP
ilum-core:
  sécurité:
    type: « LDAP »
    LDAP:
      # URL of your LDAP server (or the bundled one)
      Urls:
        - LDAP://ilum-openLDAP:389
      base: "dc=ilum,dc=cloud"
      nom d’utilisateur: "cn=admin,dc=ilum,dc=cloud"
      mot de passe: "Not@SecurePassw0rd" # Change this!
      # User search settings
      userMapping:
        base: « ou=personnes »
        filtre: « uid={0} »
      # Group search settings
      groupMapping:
        base: "ou=groups"
        filtre: « (membre={0}) »

# 3. Enable JupyterHub
ilum-jupyterhub:
  Activé: vrai

# 4. Configure Gitea with LDAP (Required for notebook storage)
Gitea:
  Activé: vrai
  Gitea:
    LDAP:
      - nom: "LDAP"
        securityProtocol: "unencrypted"
        hôte: "ilum-openldap"
        port: 389
        bindDn: "cn=admin,dc=ilum,dc=cloud"
        bindPassword: "Not@SecurePassw0rd"
        userSearchBase: "ou=people,dc=ilum,dc=cloud"
        userFilter: "(uid=%s)"
        adminFilter: "(uid=ilumadmin)"
        usernameAttribute: « UID »
        surnameAttribute: "sn"
        emailAttribute: « courrier »
        synchronizeUsers: vrai
    Configuration:
      cron:
        sync_external_users:
          ACTIVÉ: « Vrai »
          RUN_AT_START: vrai
          NOTICE_ON_SUCCESS: vrai
          SCHEDULE: "@every 5m"
          UPDATE_EXISTING: vrai
Le cron.sync_external_users configuration is Obligatoire when using LDAP authentication with Gitea. This cron job automatically synchronizes user information from your LDAP directory to Gitea every 5 minutes.
Important: Le RUN_AT_START: true setting is critical. Without this initial synchronization, operators (such as the Gitea Operator) will not have access to Gitea, preventing them from creating repositories or managing permissions for new users.
This configuration ensures that:
- New LDAP users are automatically created in Gitea when they first access JupyterHub
- User attributes (name, email) are kept in sync with LDAP
- User access is updated based on LDAP group membership changes
When upgrading Ilum or changing JupyterHub configurations, please note that running user notebook pods are NOT automatically restarted. To apply changes (such as new images, secrets, or environment variables), users must stop and restart their servers manually (via the JupyterHub control panel), or an administrator must explicitly restart them.
Enterprise Image Access
The Ilum Enterprise license grants access to private Docker repositories containing the optimized JupyterHub images required for the platform. To use these images, you must configure a Kubernetes secret to authenticate with the registry.
You can configure ilum-jupyterhub to automatically create this secret using your credentials:
ilum-jupyterhub:
  imagePullSecret:
    create: vrai
    # The registry URL provided with your license
    registry: "registry.ilum.cloud"
    # Your enterprise username
    nom d’utilisateur: "my-enterprise-user"
    # Your enterprise password/token
    mot de passe: "my-secret-token"
    Messagerie électronique: "[email protected]"
Alternatively, if you have already created a secret in your namespace (e.g., my-reg-cred), you can reference it:
ilum-jupyterhub:
  imagePullSecret:
    create: faux
    nom: "my-reg-cred"
    automaticReferenceInjection: vrai
Advanced JupyterHub Configuration
While the basic configuration enables the service, ilum-jupyterhub offers granular control over its integrations.
JupyterHub Specific LDAP
By default, JupyterHub can share the global LDAP settings, but you can also configure it independently if needed. This is useful if JupyterHub users are in a different directory or require different search filters.
ilum-jupyterhub:
  LDAP:
    Activé: vrai
    Urls:
      - LDAP://ilum-openLDAP:389
    base: "dc=ilum,dc=cloud"
    nom d’utilisateur: "cn=admin,dc=ilum,dc=cloud"
    mot de passe: "Not@SecurePassw0rd"
    adminUtilisateurs:
      - ilumadmin
      - Admin
    userSearchBase: "ou=people,dc=ilum,dc=cloud"
    userSearchFilter: « uid={0} »
    groupSearchBase: "ou=groups,dc=ilum,dc=cloud"
    groupSearchFilter: « (membre={0}) »
    allowedGroups: []
    userAttribute: « UID »
    fullnameAttribute: « CN »
    emailAttribute: « courrier »
    groupNameAttribute: « CN »
    groupMemberAttribute: "member"
    useSsl: faux
    startTls: faux
    lookupDn: vrai
Gitea Connection Settings
Le git section in ilum-jupyterhub controls how the Hub connects to Gitea to provision repositories. This is pre-configured in helm aio to use the internal Gitea, but can be customized.
ilum-jupyterhub:
  git:
    existingSecret: ilum-git-Pouvoirs
    Messagerie électronique: ilum@ilum
    dépôt: Jupyter
    address: "ilum-gitea-http:3000"
    URL: "http://ilum-gitea-http:3000"
    orgName: "ilum-jupyterhub"
    operatorImage:
      nom: docker.ilum.cloud/ilum-jupyterhub
      tag: Gitea-opérateur-4.3.1
    secret:
      nom: ilum-git-Pouvoirs
      usernameKey: nom d’utilisateur
      passwordKey: mot de passe
SSH Access to Notebook Servers
Ilum's JupyterHub packaging includes SSH access to single-user notebook pods, enabling power users to connect remotely via SSH for advanced workflows like VS Code Remote development, direct terminal access, or file synchronization. This feature is disabled by default.
For a complete guide on connecting VS Code to Jupyter pods via SSH, see the VS Code Jupyter Integration Guide.
SSH Architecture
SSH access is opt-in and requires external Kubernetes Secrets containing host keys and authorized user keys. These secrets must be created outside of Helm to ensure host fingerprints remain stable across upgrades.
The SSH implementation supports two modes:
maîtremode (default): All users share a singleauthorized_keysfile from one Kubernetes Secret. One NodePort Service provides SSH access to all user pods.perUsermode: Each user has a dedicated Secret (e.g.,ssh-keys-{username}) with their ownauthorized_keys. The SSH operator creates a separate NodePort Service for each user, providing isolated SSH endpoints.
Step 1: Generate SSH Keys
Create host keys (RSA, ECDSA, ED25519) and an authorized_keys file containing public keys of users who may SSH into notebook pods.
ssh-keygen -t rsa -b 4096 -N '' -f ssh_host_rsa_key
ssh-keygen -t ecdsa -b 521 -N '' -f ssh_host_ecdsa_key
ssh-keygen -t ed25519 -N '' -f ssh_host_ed25519_key

# For master mode: combine all user public keys
cat user1.pub user2.pub > authorized_keys
Store these files securely. The host key fingerprints must remain constant between releases, or SSH clients will show host-key warnings on every connection.
Step 2: Create Kubernetes Secret
Pour maître mode:
Create a single secret containing host keys and the shared authorized_keys:
kubectl create secret generic ilum-jupyterhub-ssh-keys \
  --from-file=ssh_host_rsa_key=ssh_host_rsa_key \
  --from-file=ssh_host_ecdsa_key=ssh_host_ecdsa_key \
  --from-file=ssh_host_ed25519_key=ssh_host_ed25519_key \
  --from-file=authorized_keys=authorized_keys
Pour perUser mode:
Create one secret per user following the naming template ssh-keys-{username} (configurable via ssh.perUserSecretNameTemplate):
# Example for user "alice"
kubectl create secret generic ssh-keys-alice \
  --from-file=authorized_keys=alice_authorized_keys
The SSH operator sidecar automatically provisions NodePort Services for every user secret it discovers, enabling per-user SSH endpoints.
Step 3: Enable SSH in Helm Configuration
Add the following to your valeurs.yaml before installing or upgrading:
ilum-jupyterhub:
  ssh:
    Activé: vrai
    mode: maître  # or "perUser" for per-user secrets and services
    keysSecret: ilum-jupyterhub-ssh-keys
    service:
      type: NodePort
      port: 2222
      nodePort: ""  # Kubernetes will auto-assign if empty
    sshdConfig:
      customConfig:
        - "StrictModes no"  # Required due to Kubernetes volume permissions
    operatorImage:
      nom: docker.ilum.cloud/ilum-jupyterhub
      tag: ssh-opérateur-4.3.1
    extraEnv:
      - nom: SSH_IDLE_TIMEOUT
        valeur: "3600"  # Optional: terminate idle SSH sessions after 1 hour
StrictModes no: Required because Kubernetes-mounted volumes may have relaxed permissions (e.g.,0777), which SSH's defaultStrictModes yeswould reject.mode: Controls whether a sharedauthorized_keys(maître) or per-user secrets/services (perUser) are used.extraEnv: Optional environment variables for the SSH operator sidecar.
Opérateur Gitea à l’intérieur de JupyterHub (détails DevOps)
For cluster administrators and maintainers, it’s useful to understand the implementation of the Opérateur Gitea qui fonctionne avec JupyterHub. Ce composant est ce qui automatise le provisionnement du référentiel Git pour les nouveaux utilisateurs :
-
Qu’est-ce que c’est? Le Gitea Operator est un petit opérateur Kubernetes (contrôleur) construit avec le Kopf framework (Kubernetes Operator Pythonic Framework). Il s’exécute dans le cadre du pod JupyterHub (et non en tant que déploiement distinct). En substance, lorsque le conteneur JupyterHub démarre, il lance également le processus d’opérateur (écrit en Python) qui se connecte au serveur API Kubernetes et à l’API Gitea.
-
Que regarde-t-il ? Il écoute événements liés à JupyterHub – specifically, it can watch for the creation of user notebook pods or Hub events via the JupyterHub API. A common design is to watch for Kubernetes Pods with a certain label (for example, label like component=singleuser-server or an annotation that JupyterHub adds for user pods). When it detects a new pod for a given user, it interprets that as “User X has logged in and their server is starting up.”
-
Dépôt/Création d’équipe : Lors d’un tel événement, l’opérateur interagira avec Gitea’s REST API pour vous assurer que l’utilisateur dispose des ressources Git nécessaires :
-
Il se peut que créer un Gitea Compte utilisateur for the logging-in user if one doesn’t exist. (If Gitea is configured to use LDAP authentication, the account might be auto-created on first login instead; the operator’s behavior might vary depending on config. In many cases, the user account in Gitea will be created the first time the user pushes or logs in to Gitea, so the operator might not explicitly create the user.)
-
Il créer une équipe et/ou une organisation to logically contain the user’s repo. For example, Ilum might have a global organization (like ilum-jupyterhub) and the operator will create a team within that org named after the user. The purpose of this is to manage repository permissions in Gitea. The team will include the user (linking their Gitea account) and possibly no one else (for a personal repo scenario). The operator uses the Gitea admin credentials (from ilum-jupyter.git.username/password ) to perform these actions via the API.
-
Ensuite, il crée un référentiel dans Gitea pour l’utilisateur. D’après la configuration précédente, nous savons que le modèle de nom de dépôt par défaut est
jupyterhub-{nom d’utilisateur}. L’opérateur créera ce dépôt (encore une fois via l’API Gitea), définira sa propriété sur l’utilisateur/l’équipe approprié, et peut-être l’initialisera. -
C’est alors attribue des autorisations – for instance, if using an organization, it ensures the created team has write access to the new repository and that the user is in that team. This way the user (when authenticated to Gitea) can read/write their repo, but others cannot (unless added). All these steps happen within a few seconds after the pod start event.
-
-
Fonctionnement en cluster : Since the operator runs inside the JupyterHub pod, it has network access to the Gitea service (internal cluster address) and to the Kubernetes API via a service account. It’s scoped only to the namespace of Ilum (it will watch for pods in that namespace). It doesn’t deploy any CRD – it is likely just watching built-in resources like Pod or Secret events. This means you won’t see a separate deployment for “gitea-operator”; it’s embedded. This design simplifies deployment but means if the JupyterHub pod is down, the operator is down too.
-
Journalisation et débogage : For DevOps, if a user’s repository isn’t getting created or the templates don’t sync, the first place to check is the JupyterHub pod’s logs. The operator typically logs its actions (e.g., “Creating Gitea repo for user X”, or errors if API calls fail). Common issues might be misconfigured credentials (e.g., wrong git password, so it can’t auth to Gitea – in such a case, you’d see a 401/403 error in the logs), or Gitea not being reachable. Also, if the user’s LDAP password contains special characters or if the operator passes it incorrectly for Git clone, there could be URL encoding issues (so ensure no problematic chars or handle them). These are things to consider when debugging.
-
Principes de base de l’opérateur Kopf : Since it uses Kopf, the operator is likely defined by a Python function decorated to react to events. Kopf handles the boilerplate of watching and scheduling the function on events. This choice makes it easier to extend the operator’s logic if needed (for example, one could modify it to create additional resources, or to clean up repos when users are removed – though automatic cleanup might not be implemented to avoid deleting user code).
This Gitea operator is primarily of interest to maintainers. Regular end users won’t see it (it’s entirely backend). However, it’s good to know it exists: any automation around Git repo creation is happening because of this component. If in the future you upgrade Ilum or Gitea, you should ensure the operator’s account still has the right permissions. For instance, if you change the Gitea admin password, update the Helm secret so that the operator continues to function.
In summary, the Gitea operator automates what would otherwise be a manual DevOps task (provisioning a Git repo for every user and linking it to their environment). It's a Automatisation native de Kubernetes living inside the JupyterHub container. DevOps teams should include this in their mental model of the system: when a new user comes online in JupyterHub, there's an automated process creating repos and teams in Gitea to support that user. If something goes wrong in that process, it can affect the user experience (e.g., user's notebook might start but their Git repo isn't ready). Thus, keep an eye on those logs during initial setup or after major changes.
Guide de première connexion pour les utilisateurs
Cette section fournit un guide rapide pour les utilisateurs finaux qui accèdent pour la première fois à JupyterHub dans Ilum.
Accéder à JupyterHub : Après vous être connecté à l’interface utilisateur d’Ilum avec vos informations d’identification SSO, vous devriez automatiquement être autorisé à accéder à votre serveur JupyterHub personnel. Pour commencer, rendez-vous sur Modules > JupyterHub in the Ilum interface. This should open your JupyterHub environment directly—without requiring a separate login.
Dépannage de l’accès :
- If, after logging in to Ilum, you are not automatically redirected to your Jupyter server, or you see the JupyterHub login page—something may be misconfigured.
- Dans ce cas, essayez de vous connecter sur la page JupyterHub à l’aide de l’icône mêmes références SSO (Ilum) que vous avez utilisé pour Ilum lui-même.
- Si vous ne parvenez toujours pas à vous connecter ou si l’on vous demande à plusieurs reprises des informations d’identification, veuillez signaler ce problème à votre administrateur Ilum.
- Il se peut également que vous ne disposiez pas de l’appartenance au groupe requise pour l’accès à Jupyter (par exemple,
utilisateurs de jupyterouScientifiques des données). Votre administrateur peut vérifier et accorder l’accès si nécessaire.
Seuls les utilisateurs autorisés (tels que déterminés par l’appartenance à LDAP ou à un groupe d’annuaires) peuvent accéder à JupyterHub. Si l’accès vous est refusé mais que vos identifiants SSO sont valides ailleurs dans Ilum, vérifiez auprès de votre administrateur concernant les autorisations.
Démarrage de votre serveur de bloc-notes : After a successful login, you will see a message like “Starting your server” or be redirected to a spawning page. JupyterHub is now launching your personal notebook server within the cluster. This can take ~30 secondes à quelques minutes, especially if it’s your first time (the system might be initializing storage, creating your Git repository, and pulling container images). Please be patient – this happens only on first startup or after the service has been idle for a long time. If the process takes too long or errors, you might see a log or an error page – in such cases, try refreshing after a minute. Usually, though, you will automatically land in the Jupyter interface once the server is ready.
Interface JupyterLab : Une fois que votre serveur est en marche, votre navigateur ouvrira le JupyterLab interface. This is a web-based IDE where you can create notebooks, write code, open a terminal, etc. On the left, you’ll see a file browser. You should notice some pre-existing folders or notebooks here – those are the Modèles de démarrage provided by Ilum. For example, you might see a “IlumIntro.ipynb” or a project folder structure. Feel free to open these notebooks to read the instructions or run the example code. They are meant to help you get started with using Spark and other features in Ilum. You can also create new notebooks by clicking the “+” icon or using the Launcher (which appears by default with options like “Python 3 (ipykernel)” or other kernels).
Utilisation de Spark dans un bloc-notes : L’un des principaux avantages de JupyterHub dans Ilum est l’exécution de tâches Spark à partir de blocs-notes.
Le flux de travail détaillé pour l’exécution d’Apache Spark dans les notebooks Ilum est décrit ici.
Reportez-vous à ce guide pour obtenir des instructions détaillées sur le démarrage des sessions Spark, la gestion des points de terminaison et l’utilisation de la magie Spark dans Ilum.
Utilisation de Git (enregistrement des blocs-notes) : N’oubliez pas que votre répertoire personnel est en fait un dépôt Git lié au serveur Gitea. Quelques conseils d’utilisation :
- When you create or modify files, a small badge on the Git icon (left sidebar) will indicate the number of changes. Click the Git icon to open the Git panel. You’ll see a list of changed files. You can stage and commit changes with a message all from this interface.
- À commettre modifications : tapez un message de commit dans le panneau Git et cliquez sur l’icône de coche (commit).
- À pousser Pour le serveur : cliquez sur l’icône de flèche vers le haut. Après l’envoi, votre travail est stocké en toute sécurité sur le serveur. Vous pouvez vous rendre sur l’interface web d’Ilum Gitea (accessible via Modules > Gitea in Ilum UI) to see your repository. It should show your latest commit. The Git integration ensures you don’t lose work even if the notebook server is recycled.
Arrêt et déconnexion :
- La déconnexion ne fait que vous déconnecter du serveur Jupyter ; C’est le cas non Arrêtez ou arrêtez immédiatement votre serveur de bloc-notes.
- Votre serveur de bloc-notes continuera à fonctionner en arrière-plan jusqu’à ce qu’il soit automatiquement désactivé par le système après une période d’inactivité (le délai d’inactivité est défini par votre administrateur).
- Avertissement: Tout travail non enregistré dans des notebooks ouverts (qui n’est pas validé dans Git ou enregistré) sera perdu si votre serveur est automatiquement arrêté en raison d’une inactivité.
- La prochaine fois que vous vous connecterez, votre serveur sera redémarré et vos fichiers seront restaurés à partir du stockage persistant (Git et votre répertoire personnel), mais les modifications non enregistrées/non synchronisées ne seront pas récupérées.
- Bonne pratique : Enregistrez toujours vos blocs-notes et validez les modifications dans Git avant de vous déconnecter ou de vous éloigner plus longtemps.